How To Train & Deploy a Computer Vision Model
Steps to Building a Custom Object Detection Model with YOLOv8 & Roboflow
1) Collect The Data
Collecting data can be very different based on the project you are preforming since this post focuses on computer vision and object detection our data will be in the form of images.
If your curious to know machine learning algorithms love data, like American love cheeseburgers and pizza… more is always better (little self deprecating humor). As is the case every model will preform differently given a small dataset. Pretrained models are a great option if you are starting with a custom data set that is relatively small. Their is no exact number that differentiates between a small medium and large dataset it really comes down to the model being used, if its pre-trained and how difficult the objects are to detect in the images. A general rule of thumb for YOLOv8 is 100-250 images for each class to achieve a usable model but again more is better. If you can supplement part of your data collection with images from online sources as well as your own images you’ll be much better off.
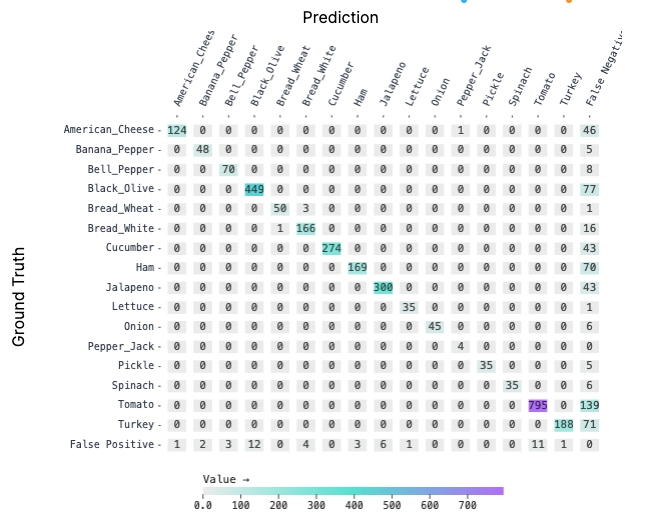
For the OrderVision Model, there are 16 classes and the approximate number of images per class is between 150 - 250.
2) Annotate The Data
Now to the fun part…I lie. Data annotation for image classification is one thing, but for object detection within images it can be a whole different beast. Different types of annotation can be used each with their own benefits. The two most common types are bounding boxes and object segmentation. Bounding boxes are exactly what it sounds like boxes with labels are drawn around the objects, while segmentation can use polygon shapes or even more advanced algorithms to draw bounding lines precisely isolating the object. While segmentation is the premier method for accuracy it’s computational needs for training are magnitudes more than bound simple bounding boxes. Not to mention the increased time for annotations. For this reason I suggest bounding boxes for most projects that don’t require need for perfect segmentation.
2a) How to Annotate
Listen and listen good, if you need to annotate 1 image or 10,000 images skip all the open source clunky garbage out there and use Roboflow! I can only speak from my own experiences using Roboflow, CVAT, labelme and labelimg. I will briefly mention a few reason why Roboflow is the go to choice.
If your reading this your likely a beginner and no other platform is simpler and more dead simple than Roboflow.
Glitches and Support: Roboflow is a company with resources and while I love the open source community, at the moment they are far behind from Roboflow’s reliability or compatibility!
Augmentation: Roboflow lets you augment data with a few clicks quickly doubling or even quadrupling your dataset size in minutes! This is serious plus as when you want to maximize your model performance.
The cloud: The only real pro of the other options is that they run locally on your machine (for the most part) so, no need to upload gigabytes of data. But if you have 1 plus gig fiber the cloud is no issue. And thus the benefits of the cloud is that all the processing (annotations, compression, and even training) is done much faster on Roboflow servers.
Training: If your just starting out or even a seasoned programmer, you would be foolish not to train and experiment with a Roboflow custom trained model, which in my experience they are quite good.
Hosting: Alright we’ve basically quite comparing the different applications since the 2nd reason that is because none of the other platforms do more than annotate, but if the last three reasons were not enough to convince you the final blow comes from Roboflow’s support for model hosting, train your model with roboflow or externally either way you can upload your model and run inferences on Roboflow’s servers without any need for setting up a server ( brain explode). Access your model with a simple API call!
3) Train Your Model
If you use the Roboflow model service as suggested above then all you need to do is select your desired Roboflow model (fast or accurate) and this step is essentially done. Roboflow will handle the rest and email you when the model is complete.
But if you would like to use your own model and set the parameters then you can still upload to roboflow after training (as long as the model is support by roboflow).
For this tutorial we will use the single shot detection model YOLOv8m, because of its easy implementation and impressive speed and accuracy.
Other YOLOv8 model sizes: yolov8n.pt yolov8s.pt yolov8m.pt yolov8l.pt yolov8x.pt
Set up Yaml Config File
First YOLOv8 Requires a YAML file for model classes and model parameters… Here is a basic set up I used on this project for sandwich data. If you are not going to upload to Roboflow then you may omit the second half of this snippet.
train: ../train/images
val: ../valid/images
test: ../test/images

nc: 16
names: ['American_Cheese', 'Banana_Pepper', 'Bell_Pepper', 'Black_Olive', 'Bread_Wheat', 'Bread_White', 'Cucumber', 'Ham', 'Jalapeno', 'Lettuce', 'Onion', 'Pepper_Jack', 'Pickle', 'Spinach', 'Tomato', 'Turkey']

roboflow:
  workspace: workspace_name
  project: project_name
  version: 1
  license: CC BY 4.0
  url: https://universe.roboflow.com/workspace_name/project_name/dataset/1
Import Packages
!pip install ultralytics

import os
from ultralytics import YOLO
from google.colab import drive

from IPython.display import display, Image
from IPython import display
display.clear_output()
!yolo mode = checks!pip install ultralytics
import os
from ultralytics import YOLO
from google.colab import drive
from IPython.display import display, Image
from IPython import display
display.clear_output()
!yolo mode = checksConnect your Google Drive
Assuming you saved the dataset in your drive, I also recommend using Google Colab for this project.
drive.mount('/content/drive')

ROOT_DIR = '/content/drive/PATH/TO/DATASET'
Model Config
Use this code if you don’t want a pre-trained model
model = YOLO("yolov8m.yaml") # build a new model from scratchUse this if you want to reduce the learning time with a pre-trained model
model = YOLO("yolov8m.pt") # load a pretrained model (recommended for training)Train the Model
results = model.train(data=os.path.join(ROOT_DIR, "data.yaml"), epochs=100) #predict on an imageValidation Preformance
Use this or review performance of validation data
metrics = model.val()Setting Up UTF For Export
import locale
locale.setlocale(locale.LC_ALL, 'en_US.UTF-8')  # Replace with your desired UTF-8 locale
Export Model
!scp -r /content/runs '/content/drive/EXPORT/PATH/'Upload Model For Cloud Based Inferencing (Roboflow)
import roboflow

# Instantiate Roboflow object with your API key
rf = roboflow.Roboflow(api_key=YOUR_API_KEY_HERE)

# Connect to project
project = rf.workspace("WORKSPACE_NAME").project("PROJECT_NAME")

# Set version
version = project.version(1)

# Upload to Roboflow
project.version(1).deploy(model_type="yolov8", model_path="/content/PATH/TO/MODEL")
Review Model Preformance
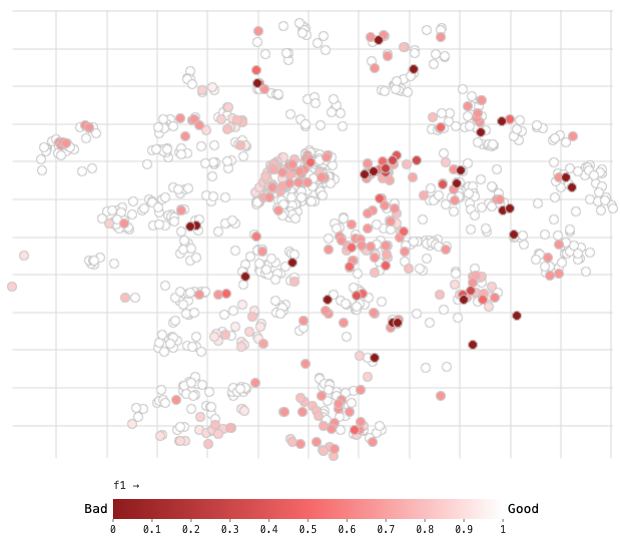
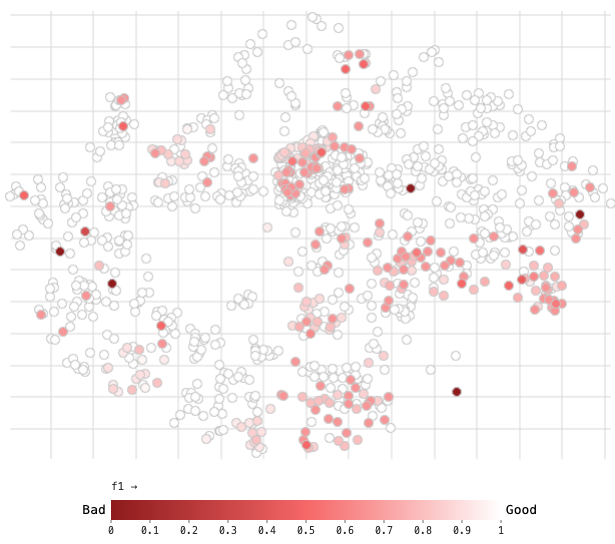
Stop before you deploy your model do some real world testing and review the training metrics either from YOLOv8 output files or the Roboflow platform. Roboflow provides a graph of the training data and how well the model was able to learn from the images. While its good to have some harder images you don’t want to many or to difficult that the “black box” model can’t properly learn from the image. The first image shows the results of the initial augmentation parameters as well as some more difficult annotations. In the image below I have removed some of the more difficult annotations and adjusted the augmentation parameter and the results are staggering not only do we result in more usable training data (more white and pink dots) but that boost in data translates into 7.70% increase in the mAP from 89.4 to 97.7 for the test data set.
Deploy the Model
Great now that the model is on Roboflow we can use the API to get inferences and predictions and the best part is Roboflow provides some starter code to run your code on the web or on device. If you’re unsure where to host your website or app my last recommendation is to check out Firebase from Google and the quick start guide they offer a free plan that is typically more than sufficient for most web apps, with 99.9% up-time and automatic SSL authentication it really is a no-brainer so, what are you waiting for go get started on Roboflow and deploy your model in hours instead of weeks!
Thanks for checking out this article I hope I was able to make the world of machine learning a tad bit clearer! Happy coding and don’t forget to do your spadework!

Landon Thornton
Thanks for visiting SpadeWork Research, we do a little bit of everything around here, financial modeling, machine learning, computer vision and data analytics. Check out my Works page for recent things I’ve worked on or check out my Interests page to learn more about me, you never know we could have something in common. I love connecting with new and passionate people, if I’ve inspired you, if you have any questions or are looking for some help on a project feel free to reach out to me on LinkedIn or Twitter.